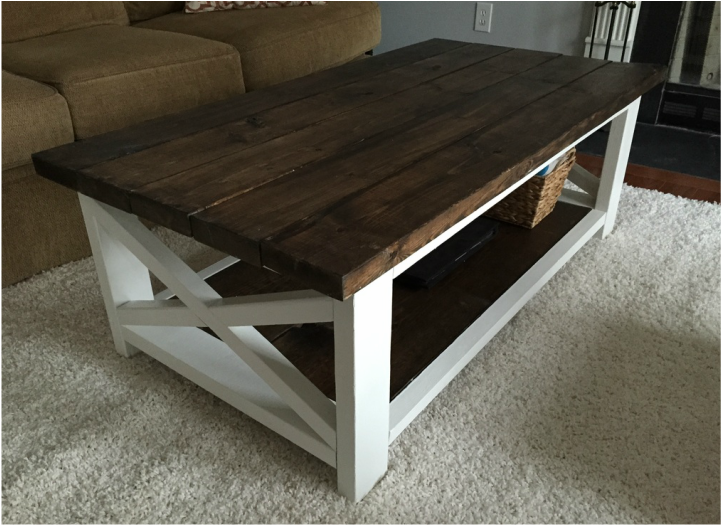
This particular coffee table has to be my most crowning achievement to date. I generally try to be humble when it comes to most projects, but this was the first time I attempted to build a piece of furniture, and I was just too proud not to gush about it.
Granted, I owe my success to another blogger. You may have heard of her. Her name is Ana White. If you haven't been on her website, you must go NOW! http://ana-white.com/. She is amazing in all ways.
Before the hubby and I got our hardwood floors in, we were using a coffee table in our family room that we got from my mother. It had passed to her from a friend of hers who moved out of town and couldn't take it. It was HORRIBLE.
Don't get me wrong, we were glad to have it. It served its purpose like most of the other furniture that was donated to us. However, there was one small problem with this particular donation. Actually, in reality, it was not a small problem at all, it was a very BIG problem. The table top was made of stone, and the legs were made of metal. The thing weighed more than I did... by a lot. No joke. Also, it was an ugly brown and tan monstrosity that didn't match anything we owned.
Like most of our other furniture, I considered giving it a makeover. But after nearly throwing my back out moving it from the family room into the garage to clear the room for the floor installation, I decided I wasn't letting that thing back in the house no matter what it looked like. So naturally, it sat in our garage for weeks before we finally loaded it into my car. Hubby drove it to the nearest Habitat for Humanity Restore and unloaded that puppy for them to sell to the next unsuspecting victim. Funny thing was... they thanked him for it profusely and went on about how generous the donation was. HA!
So that brings me back to my search for the perfect coffee table. At first, I thought I would just bite the bullet and pay for a nice new piece. After all, we had new floors and I needed something to distract from our old couch and chair. However, after doing some research, I decided that I just wasn't willing to spend several hundred dollars when I was already on a furniture makeover kick. So I began the quest to find a thrift store table that matched my criteria.
I quickly became discouraged. Coffee tables are apparently a hot commodity at thrift stores. The good ones get snatched up right away. I just couldn't find anything that was big enough for the space we had. And with my rule in place that nothing was allowed in the house that wasn't staying for the foreseeable future, we had no place to put our food, drinks, remotes, etc. We certainly couldn't entertain guests in that room.
Desperate times called for desperate measures. I hopped on Pinterest and got to work. At first, I was looking for alternative coffee table options. I saw people using crates or benches, but I just couldn't picture that in my family room. That's when I came across Ana White's option. She was claiming I could build my own coffee table for less than $85. Being the ambitious (and desperate) DIYer that I am, I decided to take her up on this offer.
The tutorial that I used is here: http://ana-white.com/2012/07/plans/rustic-x-coffee-table
I needed a specific color scheme to match the recurring theme in my house: white and wood. So I did do a few things differently, but the basics all came from Ana.
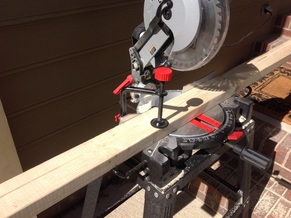
First, I copied the shopping list word for word and went to Lowes. I didn't have everything on the tool list, but I had enough to get by. I'm pretty resourceful when I need to be. Once I had the wood, I used the miter saw to cut it all just like the cut list suggested.
Granted, I owe my success to another blogger. You may have heard of her. Her name is Ana White. If you haven't been on her website, you must go NOW! http://ana-white.com/. She is amazing in all ways.
Before the hubby and I got our hardwood floors in, we were using a coffee table in our family room that we got from my mother. It had passed to her from a friend of hers who moved out of town and couldn't take it. It was HORRIBLE.
Don't get me wrong, we were glad to have it. It served its purpose like most of the other furniture that was donated to us. However, there was one small problem with this particular donation. Actually, in reality, it was not a small problem at all, it was a very BIG problem. The table top was made of stone, and the legs were made of metal. The thing weighed more than I did... by a lot. No joke. Also, it was an ugly brown and tan monstrosity that didn't match anything we owned.
Like most of our other furniture, I considered giving it a makeover. But after nearly throwing my back out moving it from the family room into the garage to clear the room for the floor installation, I decided I wasn't letting that thing back in the house no matter what it looked like. So naturally, it sat in our garage for weeks before we finally loaded it into my car. Hubby drove it to the nearest Habitat for Humanity Restore and unloaded that puppy for them to sell to the next unsuspecting victim. Funny thing was... they thanked him for it profusely and went on about how generous the donation was. HA!
So that brings me back to my search for the perfect coffee table. At first, I thought I would just bite the bullet and pay for a nice new piece. After all, we had new floors and I needed something to distract from our old couch and chair. However, after doing some research, I decided that I just wasn't willing to spend several hundred dollars when I was already on a furniture makeover kick. So I began the quest to find a thrift store table that matched my criteria.
I quickly became discouraged. Coffee tables are apparently a hot commodity at thrift stores. The good ones get snatched up right away. I just couldn't find anything that was big enough for the space we had. And with my rule in place that nothing was allowed in the house that wasn't staying for the foreseeable future, we had no place to put our food, drinks, remotes, etc. We certainly couldn't entertain guests in that room.
Desperate times called for desperate measures. I hopped on Pinterest and got to work. At first, I was looking for alternative coffee table options. I saw people using crates or benches, but I just couldn't picture that in my family room. That's when I came across Ana White's option. She was claiming I could build my own coffee table for less than $85. Being the ambitious (and desperate) DIYer that I am, I decided to take her up on this offer.
The tutorial that I used is here: http://ana-white.com/2012/07/plans/rustic-x-coffee-table
I needed a specific color scheme to match the recurring theme in my house: white and wood. So I did do a few things differently, but the basics all came from Ana.
First, I copied the shopping list word for word and went to Lowes. I didn't have everything on the tool list, but I had enough to get by. I'm pretty resourceful when I need to be. Once I had the wood, I used the miter saw to cut it all just like the cut list suggested.
 Shopping List: 2 – 2x4 – 8 feet 4 – 2x2 – 8 feet 1 – 1x12 – 8 feet long 5 – 2x6 – stud length 1 1/4” and 2 1/2” PH screws | Cut List: 4 – 2x4 @ 16 1/2” (legs) 4 – 2x2 @ 41” (side trim) 4 – 2x4 @ 22 1/2” (end trim) 2 – 1x12 @ 41” (bottom shelf) 2 – 2x2 @ 22 1/2” (both ends cut at 60 degrees off square, long point to short point, ends are parallel) 4 – 2x2 @ 11 1/4” (long point to short point, one end cut at 60 degrees off square, other end cut at 30 degrees off square, ends are not parallel but are cut in same direction) 5 – 2x6 @ 52” (tabletop boards) |
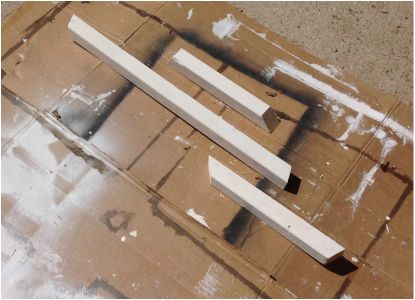
I'd never used the miter saw to cut angles before so I had a very difficult time with some of the cuts. I actually gave up on the 2x2s for a while and started assembling the base instead.
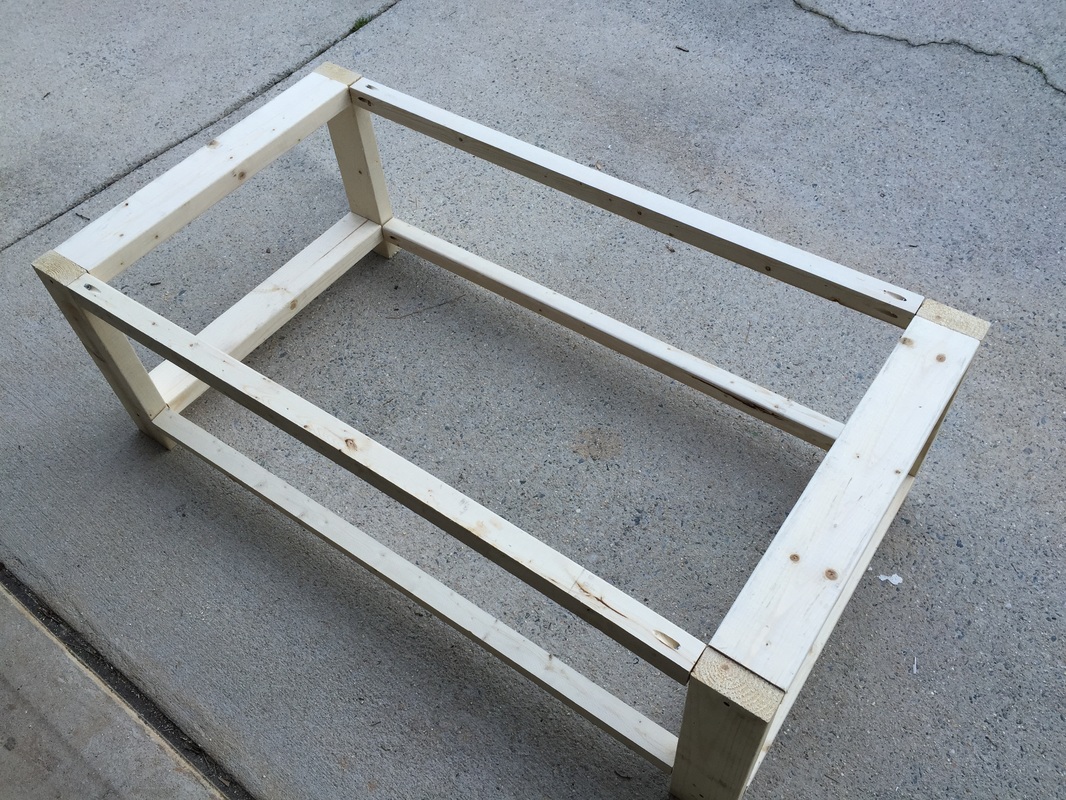
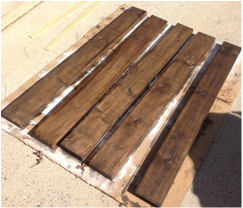
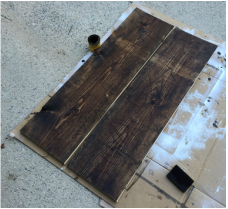
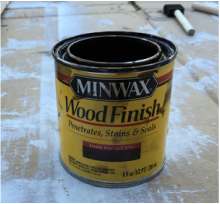
I used my mini Kreg Jig kit that I got off of Amazon to drill the pocket holes. The structure was a little wobbly so the hubby graciously used his brute strength to tighten up the screws. Once I had the base assembled, I stained the wood that I was using for the top and the shelf of the table with a walnut wood stain I already had.
 |  |  |
While I waited for the stained wood to dry, I painted the already assembled base. Like most of the items in our house, I wanted the coffee table to be white and walnut. So I painted the base with two layers of primer and two layers of white paint.
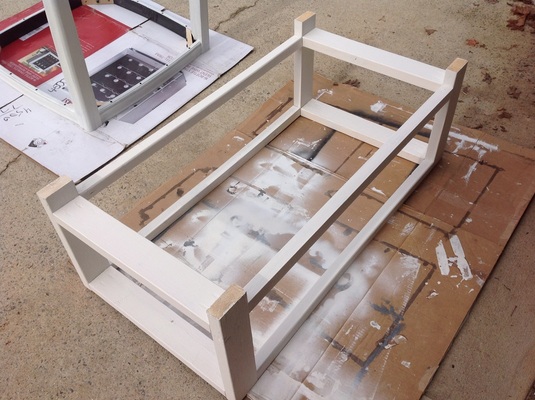
Yes, that is yet another furniture makeover in the background of that picture. That is my kitchen table that will surely be another post in the near future.
Once the base was painted, and the top and shelf were stained, I began the task of assembly. I had to drill some more pocket holes with my Kreg Jig in order to install the shelf on the bottom of the table. It took me a while to hammer the shelf in and screw it into place. There was a lot of sanding going on in order to get it to fit. Nothing is ever easy.
Once the base was painted, and the top and shelf were stained, I began the task of assembly. I had to drill some more pocket holes with my Kreg Jig in order to install the shelf on the bottom of the table. It took me a while to hammer the shelf in and screw it into place. There was a lot of sanding going on in order to get it to fit. Nothing is ever easy.
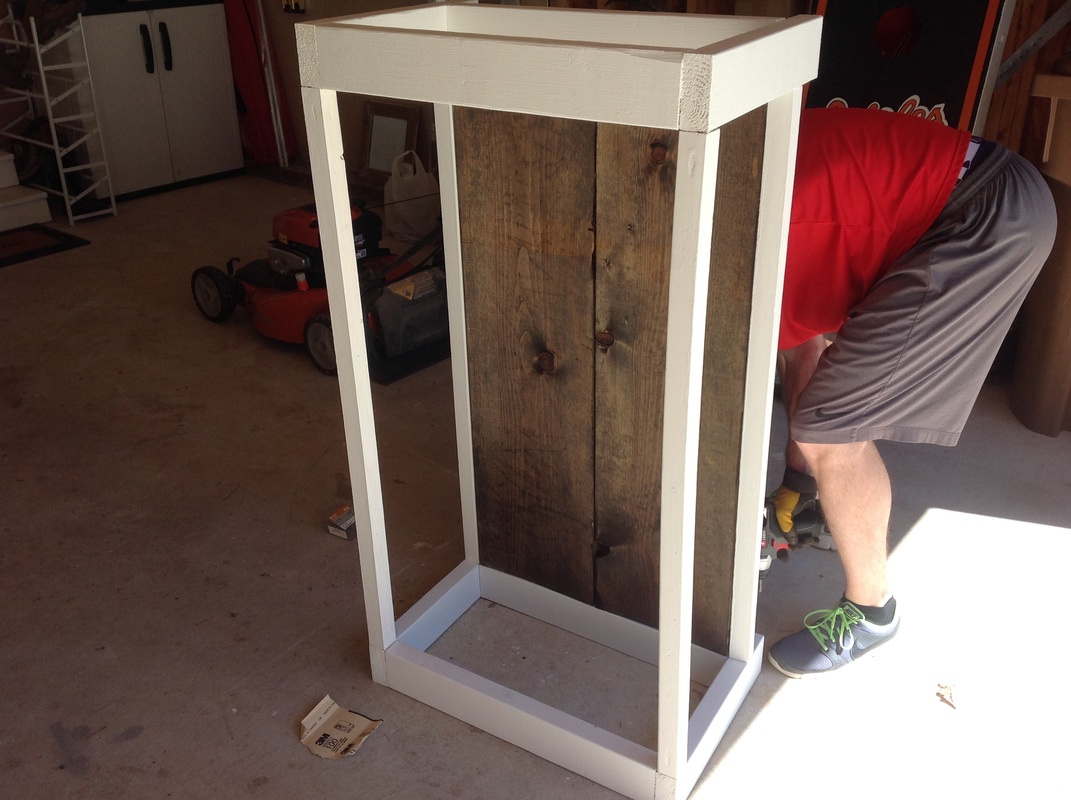 Enlisting the hubby's help while I take pictures | 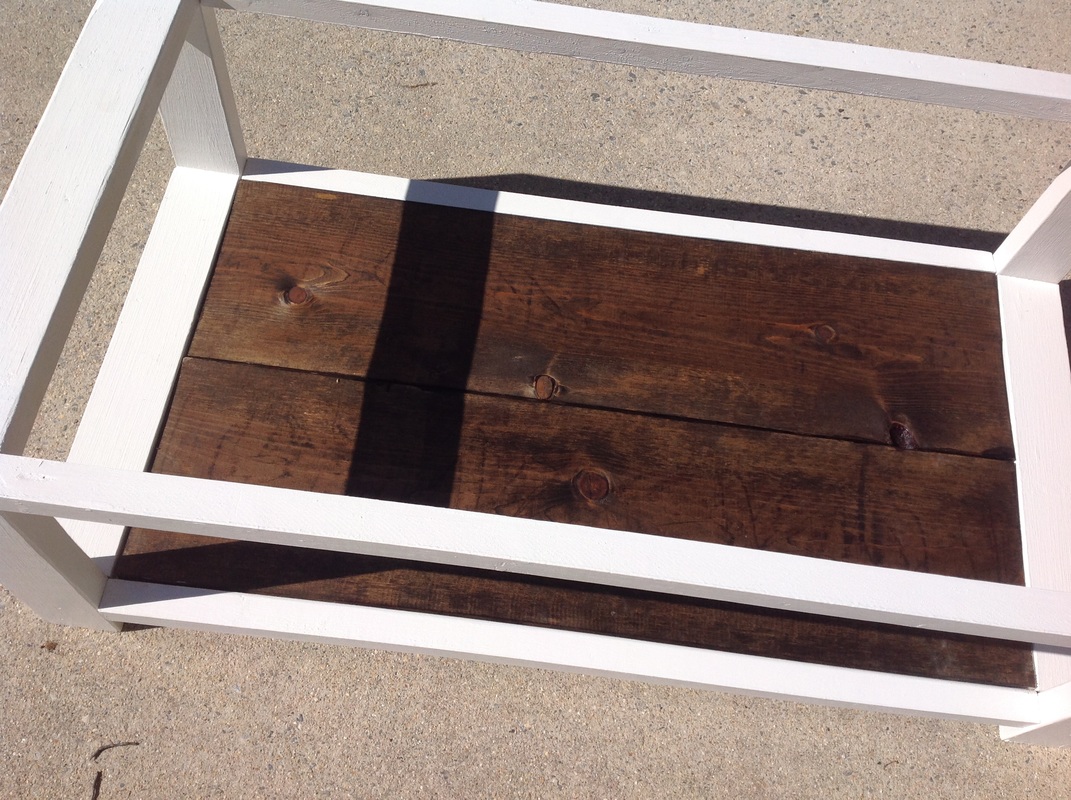 Starting to look like a table! |
Once I had the shelf in, I stained it with a layer of polyurethane. I chose to apply it after installation in case I scratched up the wood while I was putting it together (which I did). The layer of polyurethane smoothed everything over.
Once the shelf was secure, I flipped over the wood for the top of the table and laid the base on top. I pre-drilled some holes through the base and then put the screws through to secure the top. I put one screw on each side of the wood planks. I don't have any pictures of that part of the process because I did it at 5:00 in the morning and totally forgot the get my photographic evidence. Once secure, I flipped the whole table over.
Once the shelf was secure, I flipped over the wood for the top of the table and laid the base on top. I pre-drilled some holes through the base and then put the screws through to secure the top. I put one screw on each side of the wood planks. I don't have any pictures of that part of the process because I did it at 5:00 in the morning and totally forgot the get my photographic evidence. Once secure, I flipped the whole table over.
I waited to apply three layers of polyurethane to the table top after I assembled it for the same reason I waited to apply it to the shelf. I knew I would scratch the wood in the assembly process, and once again, I did. The polyurethane covered the scratches and made it look perfect!
I almost left the table as it was. After all, it looked fine. However, the thing that sold me on the Ana White plans was the "X braces" on the sides of the table. And even though I was having a hard time wrapping my head around the angles on the miter saw, I decided the table had to have them. So instead of trying to decipher the instructions on the cut list, I decided to just wing it. I know what you are thinking... "If she can't figure out how to do it with step-by-step instructions, how on earth does she think she is going to be able to guess it?"
I went with the old school approach. I held my 2x2s up to the empty space and drew lines on them where the cut lines needed to be. Then I adjusted the angle on my miter saw to line up with those cut lines. I didn't even bother looking at what the actual angles were. I'm sure that if I did, they would have been exactly what Ana White had instructed from the beginning. I'm sure there is some logical right brain vs left brain explanation for those who learn better by doing than by reading, but looking that up would require me to read...
Once I had the 2x2s cut, I painted them with primer. Then I drilled my pocket holes with the Kreg Jig and locked them into place with my screws. At this point, I filled most of the pocket holes with wood filler and let them dry. I sanded them down and painted over them with a layer of white paint. Normally, this step would be done along the way, but I wasn't even thinking about it until I put the X braces on and could see some of the pocket holes.
Once all the paint dried, I took a few minutes to marvel at my work. I was really impressed. I mean, I BUILT my own coffee table. Granted, they weren't my plans, and I had step-by-step assembly instructions, but still... I did the work, and that was enough to make me proud of myself.
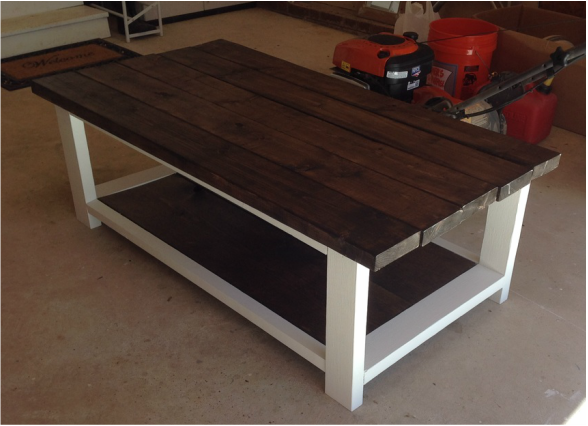
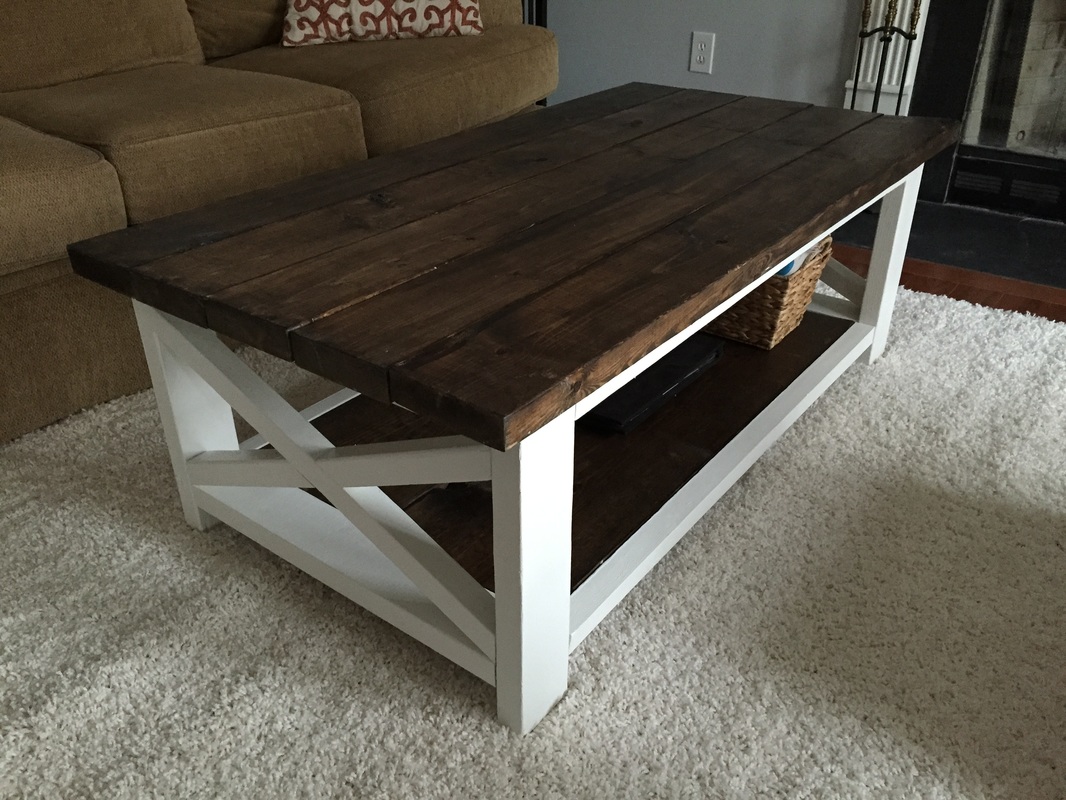
Once I moved the table into the family room, I fell in love all over again. All the imperfections I noticed in the garage seemed to disappear in the house. It was the perfect size and color, and it had so much functionality! The bottom shelf was spacious enough to hold all the stuff I didn't want out in the open: remotes, blanket, starter logs, magazines, books, coasters, etc. LOVE!!!
Once all the paint dried, I took a few minutes to marvel at my work. I was really impressed. I mean, I BUILT my own coffee table. Granted, they weren't my plans, and I had step-by-step assembly instructions, but still... I did the work, and that was enough to make me proud of myself.
Once I moved the table into the family room, I fell in love all over again. All the imperfections I noticed in the garage seemed to disappear in the house. It was the perfect size and color, and it had so much functionality! The bottom shelf was spacious enough to hold all the stuff I didn't want out in the open: remotes, blanket, starter logs, magazines, books, coasters, etc. LOVE!!!
 | 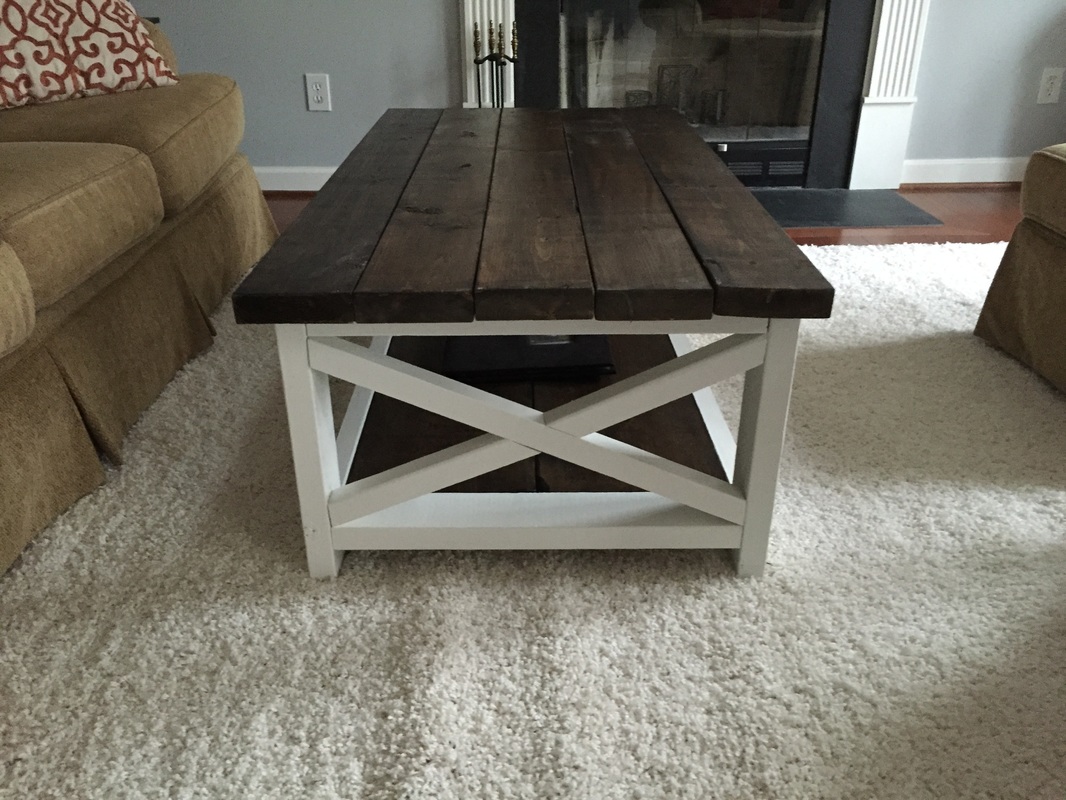 |
BIG thank you to Ana White for the perfect solution to my family room problem.
Side Note: This project did something to me. Building furniture had never even been on my radar until I found these plans. And after managing to have such great success on my first try, I have been on a Pinterest tear. I have pinned A LOT of DIY furniture projects for the future. I even started a buffet table for my dining room. I'm not even using plans. I just started building the other day, and I am super excited about the progress. Here is a sneak peak.
Side Note: This project did something to me. Building furniture had never even been on my radar until I found these plans. And after managing to have such great success on my first try, I have been on a Pinterest tear. I have pinned A LOT of DIY furniture projects for the future. I even started a buffet table for my dining room. I'm not even using plans. I just started building the other day, and I am super excited about the progress. Here is a sneak peak.
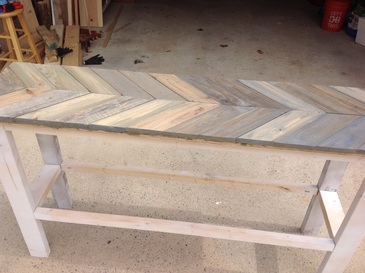
Buffet Table in the Works - Future Blog Post!
 RSS Feed
