Finally! After several weeks of waiting, I finally have a new post. I'm into the last month of my pregnancy and I grossly underestimated how busy I would be. However, since the due date is so close now, there will be no more traveling until baby is born, and I will probably stop working shortly. So I should have some time to post a few more projects (hopefully).
While I still need to finish the nursery (yikes!), and decorate for Christmas, this week's post is about the gingerbread house I entered in the Raleigh Winterfest contest this year. I admit, this particular project took up a lot of my time over the past two weeks. So I am glad I can turn it into a nifty post with some tips and tricks that I hope will be useful to anyone who wants to make a gingerbread house of their own this holiday season.
SPOILER ALERT: I did not take home first prize this year. I got second place in the contest. Being somewhat of a perfectionist, I was naturally a little disappointed, but I got over it pretty quickly. I won the contest last year and I knew it would be hard going in as the defending champion. I still think I had a solid 2015 entry. So let me tell you a little bit about it.
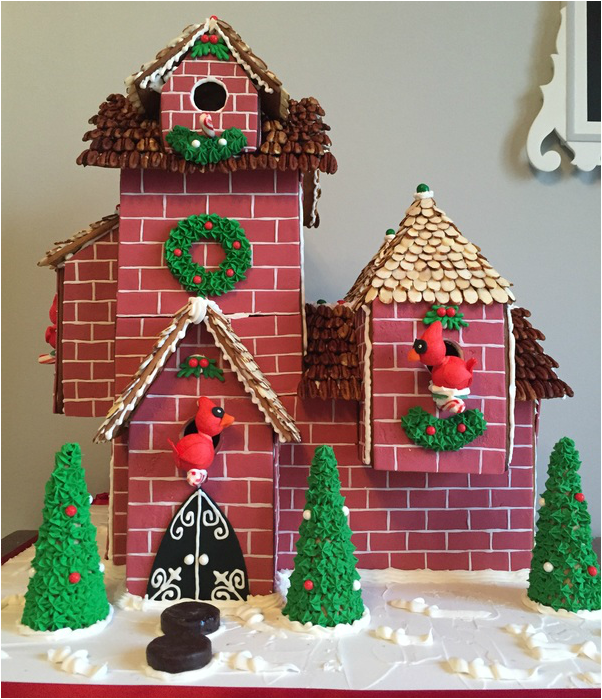
This year's entry was a birdhouse. I did a lot of research on gingerbread house contest winners and tried to find a theme that people tended to like. Since it was a Raleigh contest, I knew I wanted to do something North Carolina related. The Cardinal is the NC state bird, and I just love cardinals. So I decided to incorporate the bird into my creation. The birdhouse idea just kind of came to me after that. I knew I could get a decent sized structure out of that and some cute holiday decorations too.
I started by sketching up my idea in my sketchpad. I always start my projects by drawing them out. Most of the time my end result doesn't even completely look like the sketch I drew in the beginning. However, it's a great starting point and it helps get the creative juices flowing.
While I still need to finish the nursery (yikes!), and decorate for Christmas, this week's post is about the gingerbread house I entered in the Raleigh Winterfest contest this year. I admit, this particular project took up a lot of my time over the past two weeks. So I am glad I can turn it into a nifty post with some tips and tricks that I hope will be useful to anyone who wants to make a gingerbread house of their own this holiday season.
SPOILER ALERT: I did not take home first prize this year. I got second place in the contest. Being somewhat of a perfectionist, I was naturally a little disappointed, but I got over it pretty quickly. I won the contest last year and I knew it would be hard going in as the defending champion. I still think I had a solid 2015 entry. So let me tell you a little bit about it.
This year's entry was a birdhouse. I did a lot of research on gingerbread house contest winners and tried to find a theme that people tended to like. Since it was a Raleigh contest, I knew I wanted to do something North Carolina related. The Cardinal is the NC state bird, and I just love cardinals. So I decided to incorporate the bird into my creation. The birdhouse idea just kind of came to me after that. I knew I could get a decent sized structure out of that and some cute holiday decorations too.
I started by sketching up my idea in my sketchpad. I always start my projects by drawing them out. Most of the time my end result doesn't even completely look like the sketch I drew in the beginning. However, it's a great starting point and it helps get the creative juices flowing.
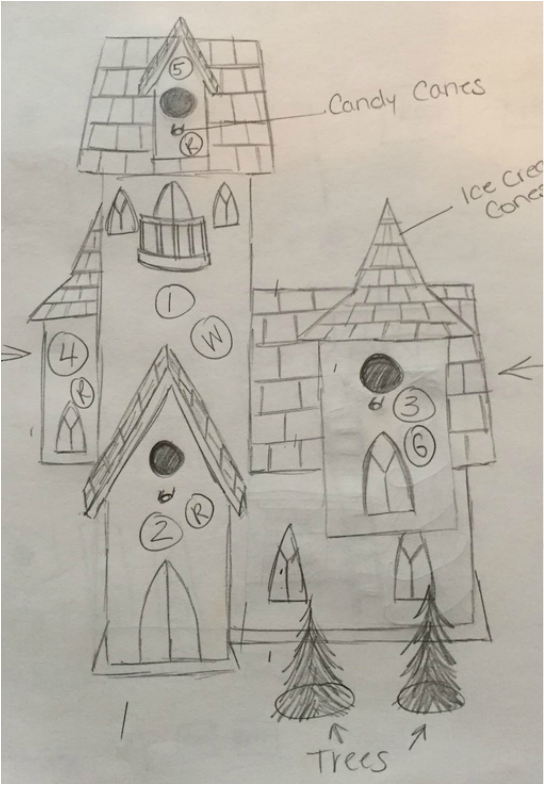
In this particular case, my final structure actually looked very similar to the drawing I made. I did make a few changes based on visual preference along the way.
Once I had my sketch drawn, I started coming up with the measurements. The contest rules stated that the entry had to be less than 24 inches tall and wide on all four sides. That's 2 feet on each side. It may not seem like a lot when you think about it, but trust me, it is. I decided to make my base 21 inches by 21 inches. So I cut a square piece of plywood to match those dimensions.
I couldn't really decide how tall I wanted the house to be. Tall houses are noticeable and more fun to decorate, but they are much harder to get to stand on their own. Ultimately, my sketchbook determined the height of the house for me. It was a 14" x 17" book. So I decided my house would be 17 inches tall so I could fit the sketches into my sketchbook. Problem solved.
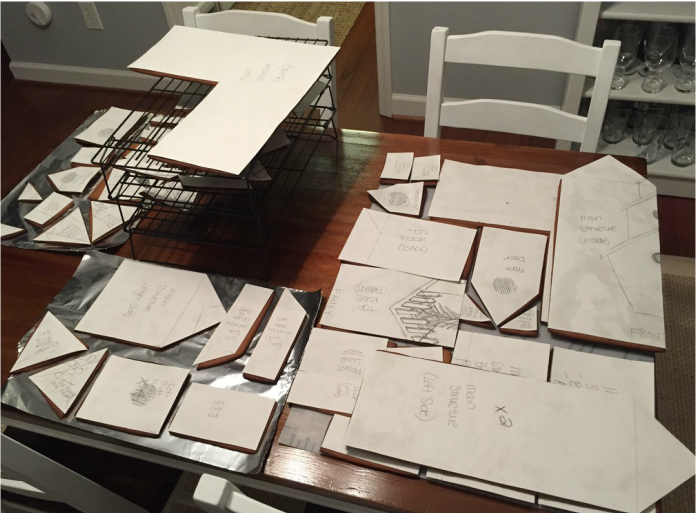
I drew out all the different parts of my house that I would need to bake with gingerbread. That included all the walls, the roof, the pop-out windows, etc. It was A LOT of gingerbread.
Once I had my sketch drawn, I started coming up with the measurements. The contest rules stated that the entry had to be less than 24 inches tall and wide on all four sides. That's 2 feet on each side. It may not seem like a lot when you think about it, but trust me, it is. I decided to make my base 21 inches by 21 inches. So I cut a square piece of plywood to match those dimensions.
I couldn't really decide how tall I wanted the house to be. Tall houses are noticeable and more fun to decorate, but they are much harder to get to stand on their own. Ultimately, my sketchbook determined the height of the house for me. It was a 14" x 17" book. So I decided my house would be 17 inches tall so I could fit the sketches into my sketchbook. Problem solved.
I drew out all the different parts of my house that I would need to bake with gingerbread. That included all the walls, the roof, the pop-out windows, etc. It was A LOT of gingerbread.
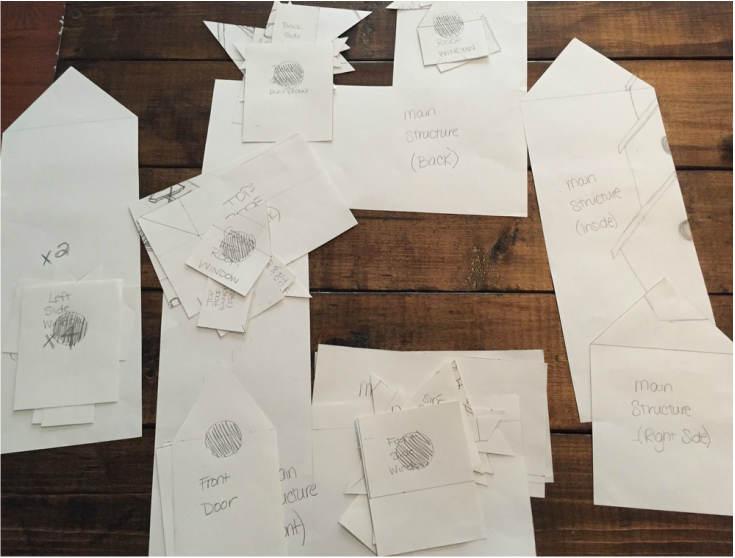
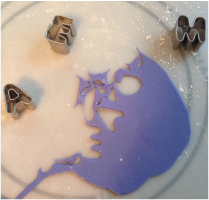
I labeled every single part so I would know what was supposed to go where. This part of the project took forever! I spent two days on a gingerbread house before I even baked any gingerbread. But it was totally worth it. I only had to make the gingerbread once.
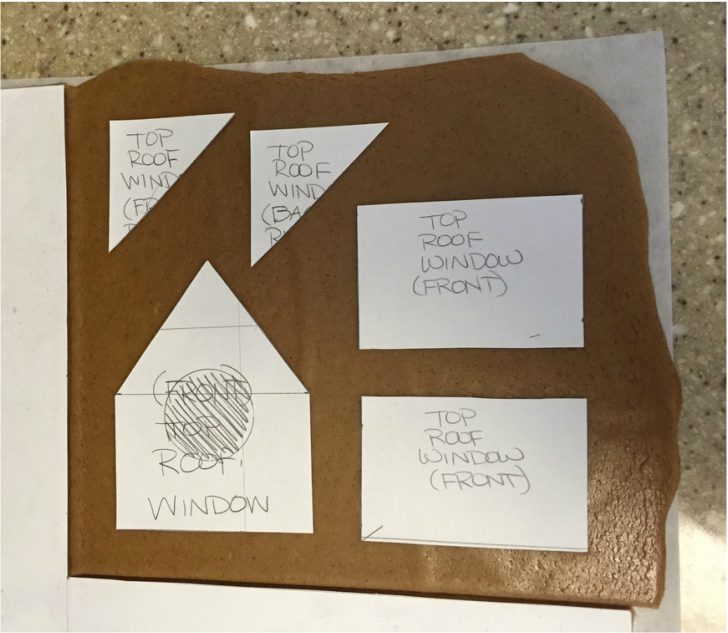
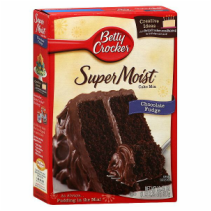
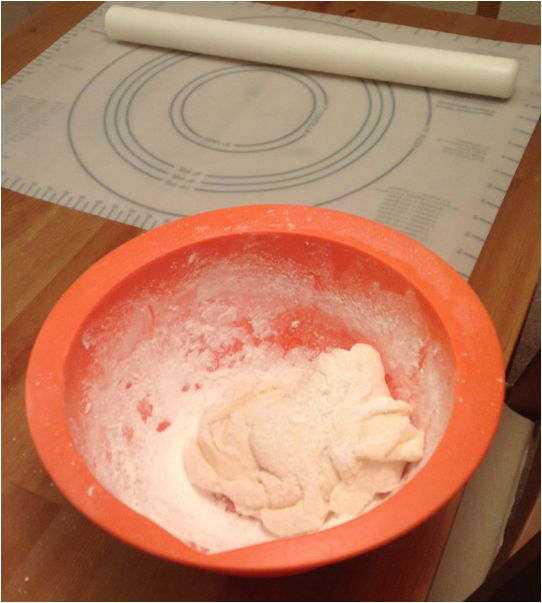
Once I had all my pieces cut out, I finally began on the actual gingerbread. I used this recipe to make the gingerbread.. I actually had to double the recipe to get the amount I needed for this project. But if you are just making a smaller house for decoration, the recipe listed will be sufficient.
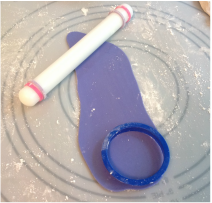
Once I had the mix, I rolled out the dough on parchment paper and used my paper cutouts as stencils to cut the pieces down to size.
Once I had all my pieces cut out, I finally began on the actual gingerbread. I used this recipe to make the gingerbread.. I actually had to double the recipe to get the amount I needed for this project. But if you are just making a smaller house for decoration, the recipe listed will be sufficient.
Once I had the mix, I rolled out the dough on parchment paper and used my paper cutouts as stencils to cut the pieces down to size.
Then I placed the parchment paper onto cookie sheets and baked the parts at 375 degrees until they looked done. The time varied a lot because my pieces were drastically different sizes. I was careful to bake them until the edges were turning brown, but not to burn them. The burned pieces usually start out nice and hard, but get soft and crumple after a few days. Not ideal.
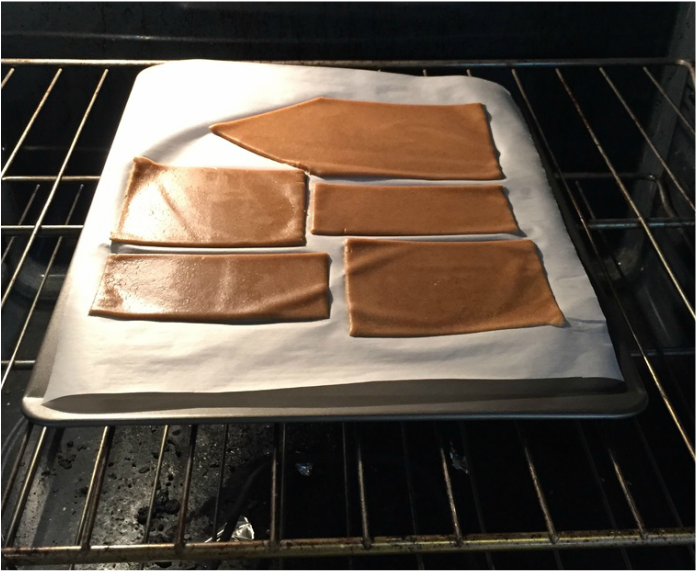
Once the pieces were baked, I let them sit for a few minutes then removed them from the cookie sheets and placed them on cooling racks.
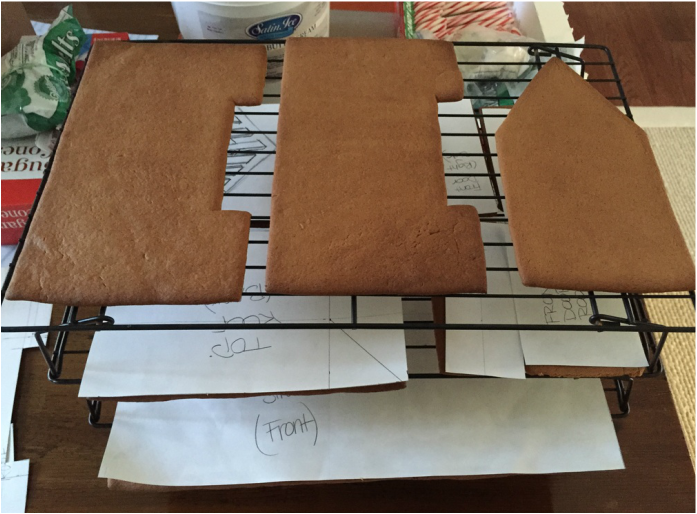
I placed my stencil cutouts right back on top of the gingerbread pieces to keep track of each of them. This was a pretty crucial step for me since there were so many individual pieces. Then I let all the pieces cool and harden overnight.
My next step was to start decorating. Here is where I changed up my methods from 2014 to 2015. For my entry in 2014, I assembled all the part of my house before doing any of the decorations. So when it came time to decorate, I had to glue (with royal icing) all of my parts to the structure. It took forever! I spent loads of time just holding pieces and waiting for them to dry enough to stick on their own. This year, I didn't have nearly as much time (or patience) to complete my house. So I decided to decorate all the sides as best I could before assembling the structure. It was a total time and sanity saver.
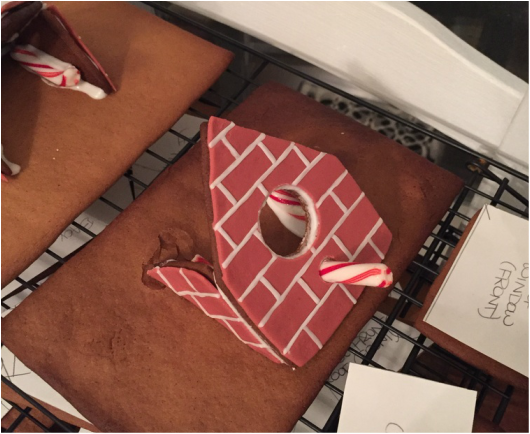
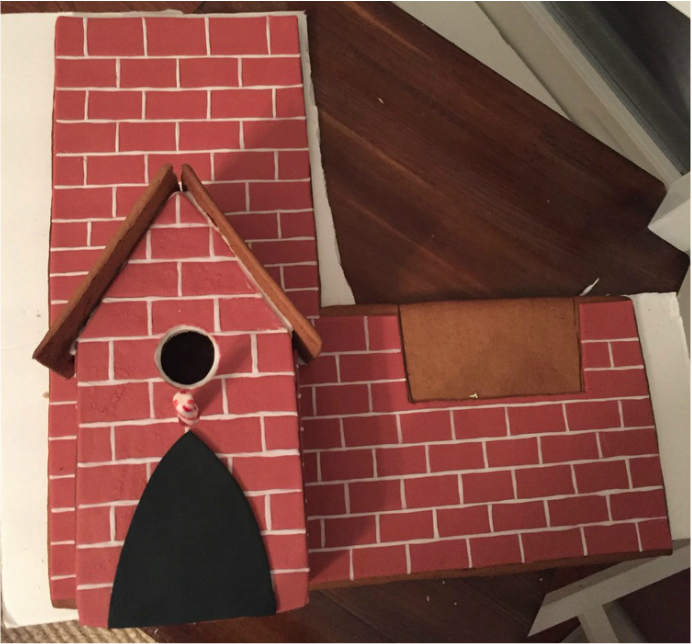
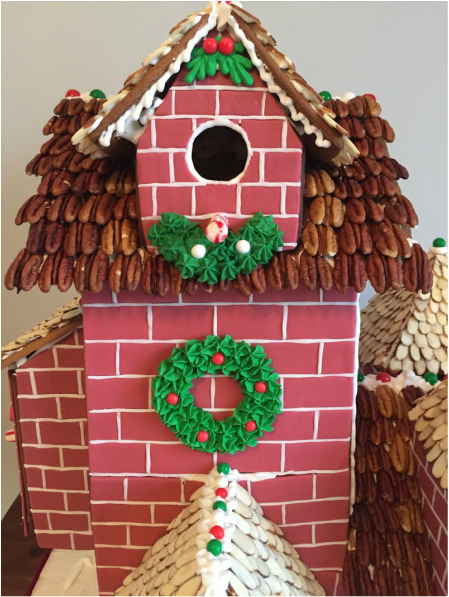
I decided that I wanted to do "bricks" for the main structure of the birdhouse. Instead of trying to do something crazy like cut out a million individual bricks, I decided to just roll out some brick-colored fondant that I could glue to the sides. Then I added small strips of white fondant to make it look like individual bricks.
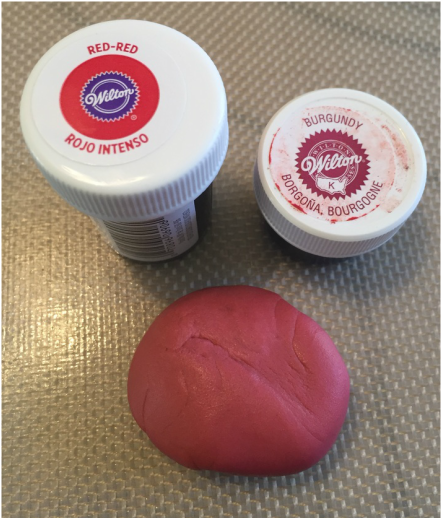
I started with some white fondant.
I decided that I wanted to do "bricks" for the main structure of the birdhouse. Instead of trying to do something crazy like cut out a million individual bricks, I decided to just roll out some brick-colored fondant that I could glue to the sides. Then I added small strips of white fondant to make it look like individual bricks.
I started with some white fondant.
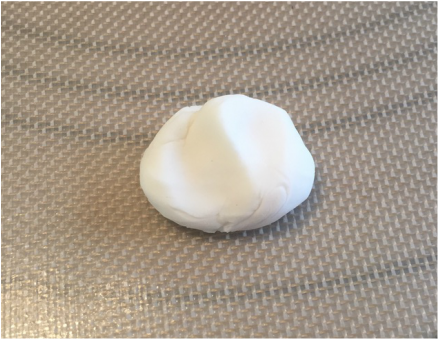
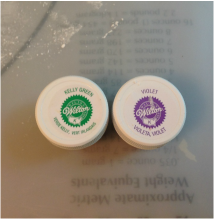
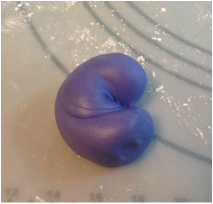
I dipped the fondant in two different gel food colors and rolled and kneaded it until I got my desired "brick" color.
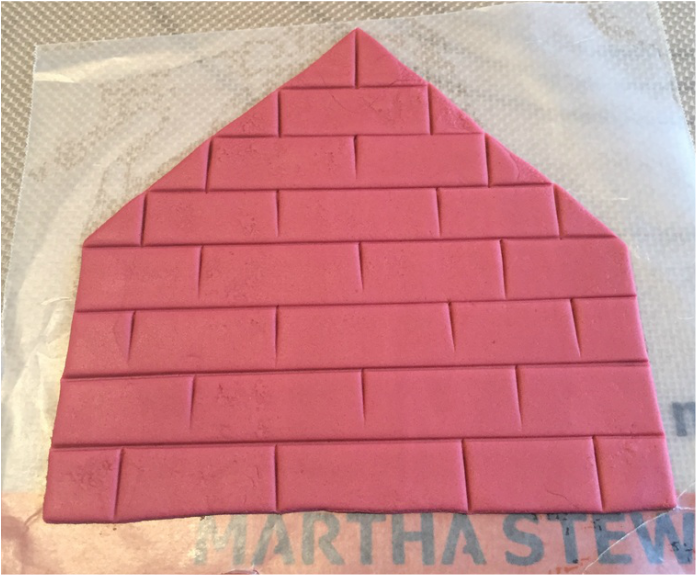
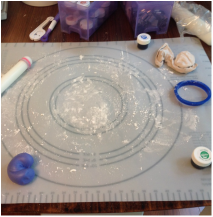
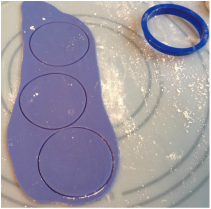
Once I had my color, I used a roller to flatten the fondant out to my desired thickness. I used my paper stencils to cut it down to the size of the gingerbread pieces I wanted covered. Then I placed each fondant piece on some wax paper and used a ruler and some of my Wilton tools to create line indents where I wanted the white lines to go.
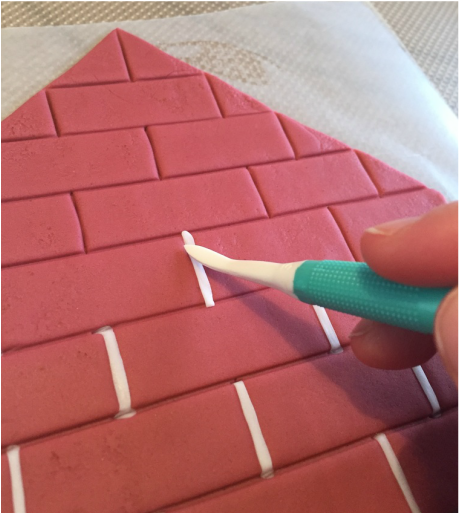
I used white fondant to roll out very thin lines. Then I brushed small amounts of water into the fondant brick crevices and placed the white lines inside. The water acts as an adhesive for fondant on fondant work. I used one of my Wilton tools to lightly press the lines into the crevices so they would stay in place. To answer your question, yes, this did take FOREVER. But the end result was pretty cool.
I let each of the fondant pieces dry and harden a little overnight before I peeled them off the wax paper and glued them to their respective gingerbread pieces with royal icing.
NOTE: Right around now is when I started forgetting to take lots of pictures of the process. That usually happens at some point. I can still explain pretty well what I did.
Once I had all the brick sides done, I started assembling some of the parts. I didn't start putting the full structure together yet, but I did start adding the smaller parts to the bigger parts. For example, I had what I can only describe as "bay windows" for the birds that needed to be added to the front, back, and sides of the four main walls.
I got pretty creative with the way I attached these parts. Mostly, I used royal icing, but I added a lot of edible attachments as well (like Kit Kats).
I even added my windows to the roof as well. I hadn't yet decorated the roof and didn't plan to until the structure was assembled. That was one part I felt had to be decorated last.
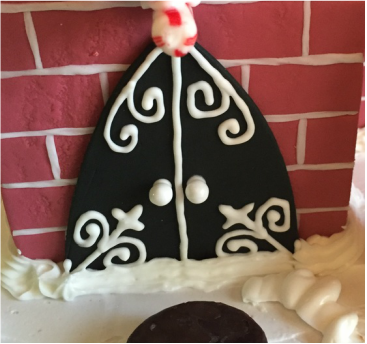
Once I had those parts assembled, I added a front door as well. I used black fondant to cut out a door and royal icing to glue it on.
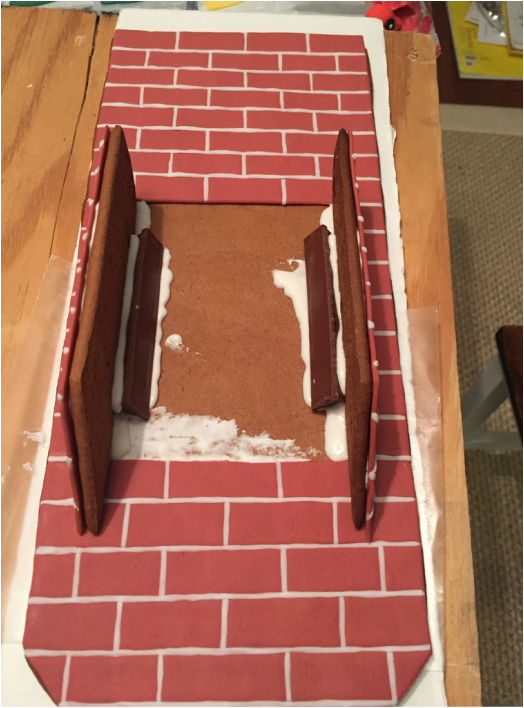
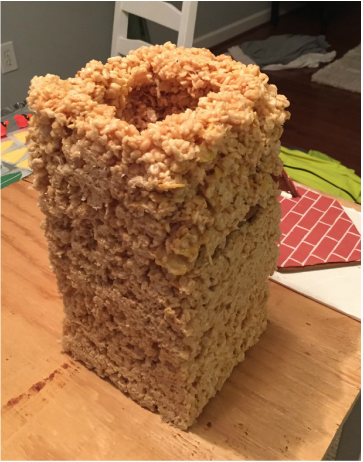
After all the parts were added to the four main sides that reasonably could be, I assembled the full structure. My idea was to use Rice Krispy treats to hold the sides together. I cooked up two batches and built them into a tall rectangular structure that I thought would be perfect. I even used a bread knife to shave down the sides. It was pretty solid.
Then hubby and I left to go visit family in MD for the week of Thanksgiving. I figured the 5 or 6 days we were gone would be perfect for everything involving the house to dry and harden even more. Especially the Rice Krispy structure.
I was wrong. I came back to a gooey, soft pile of cereal and marshmallow. Thank goodness I didn't try to put the structure together before we left. It probably would have ruined the entire thing. Then I really would have been in trouble.
I was wrong. I came back to a gooey, soft pile of cereal and marshmallow. Thank goodness I didn't try to put the structure together before we left. It probably would have ruined the entire thing. Then I really would have been in trouble.
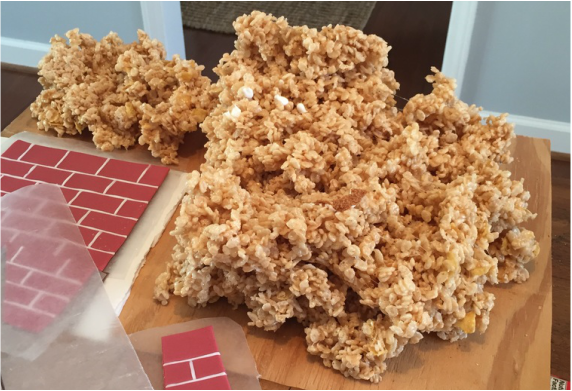
Lesson learned by me and hopefully taught to you. Don't use Rice Krispy treats to hold anything in place.
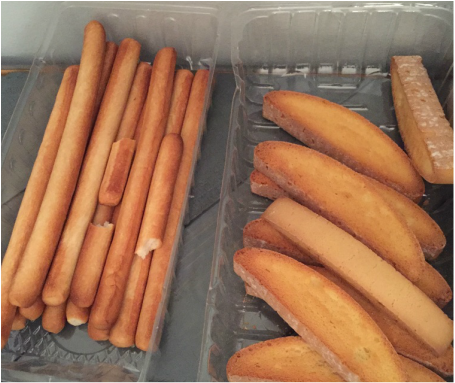
I switched gears and went to the grocery store in search of something edible that could help me. The rules of the contest were clear. Everything but the base had to be edible. Otherwise, I would have used a cardboard box or something equally as sturdy and easy.
Instead, I found breadsticks. I scooped up some packets and went to work. I pulled the sides of the structure together and glued some breadsticks into the corners and bottom. I used boxes to hold the sides up while everything dried. It was a tedious process. I even managed to use some of the mangled Rice Krispies in the corners.
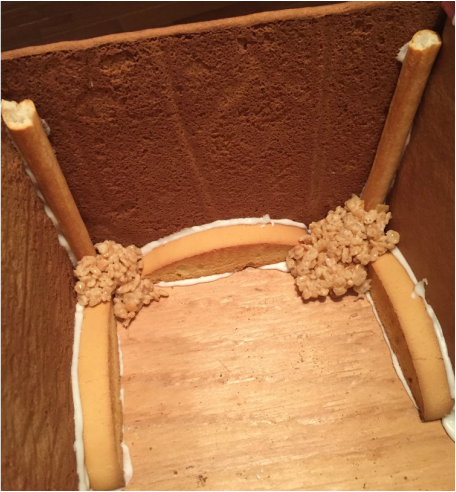
Once the four sides were assembled, I added all the rooftops. I used royal icing to put everything together. It dries hard and acts as a really good glue. It is also very helpful with damage control. There is always some sort of damage control needed. I broke a lot of gingerbread pieces that needed repair along the way.
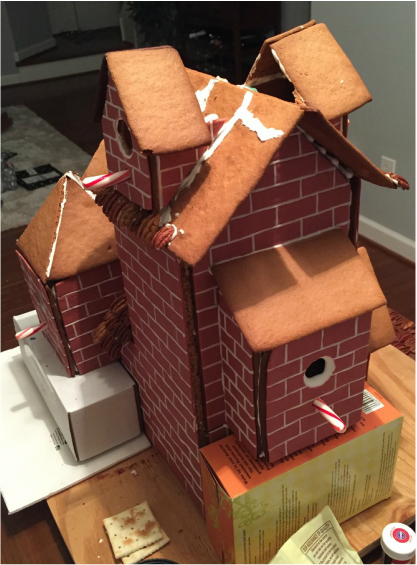
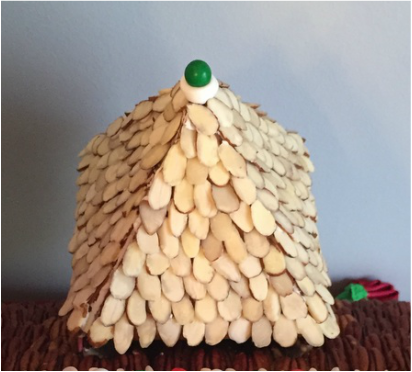
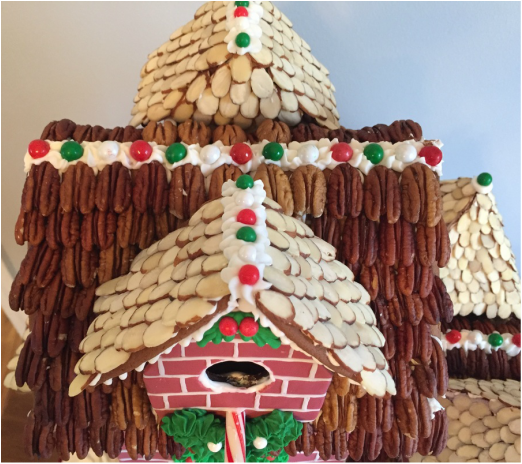
The next step was to start adding the finishing details. I started with the roof. As for the main roof, I used full pecans. I started at the base of the roof, gluing each pecan on. I stacked each of the rows on top of one another to cover up as much glue as possible.
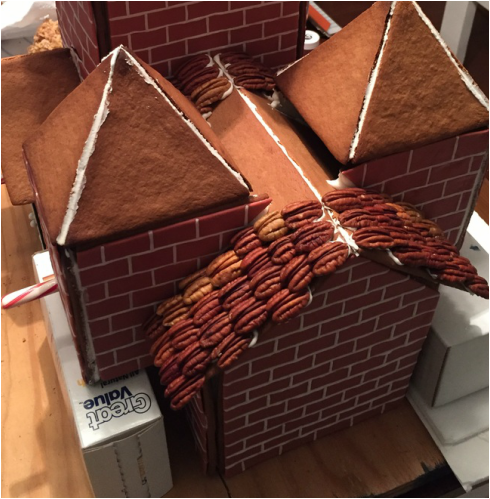
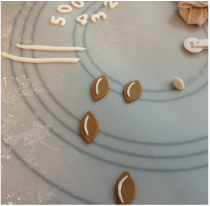
For the roof parts that weren't attached to the main structure, I used sliced almonds. It provided another dimension to the house and more color, too.
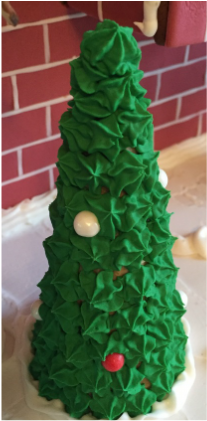
Once the roof was done, I created a few royal icing and gum paste additions. I colored some royal icing green and used my Wilton icing tips to create a few wreaths, some holly, and trees. I piped the green icing onto ice cream cones for the trees and embellished them with a few candy coated chocolate pieces.
I also used the white royal icing to pipe some details onto the front door and to cover the base of the structure in "snow".
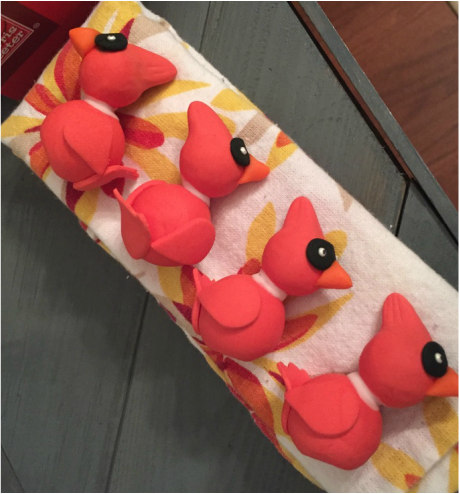
I used gum paste to create little cardinals and glued their heads to their bodies. Gum paste doesn't hold the food coloring as well as the fondant does. So once I created the birds and let them dry, I painted them with a mixture of red gel food coloring and vodka to get them to be a deeper red color. The vodka keeps the gum paste (and fondant) from drying out and cracking, and the "paint" covered up the white icing I used on their necks. Their beaks and eyes were made with fondant and sprinkles.
After all my decorations were dry, I added them to the house. I just used royal icing to attach them all. I also used the icing to fill in any gaps on the house. Also, I added the icing to any parts that looked like they needed a little "snow" on them. I added some of the candy-coated chocolate balls to the parts where the roof came to a point. This just added a little bit more red and green.
And that's it! I had my entry ready for the Raleigh Winterfest Gingerbread House Contest. I called it "Cardinal Family Christmas". I packed that baby into the car and drove way too slow during Friday afternoon rush hour to downtown Raleigh to deliver it. Luckily it arrived in one piece.

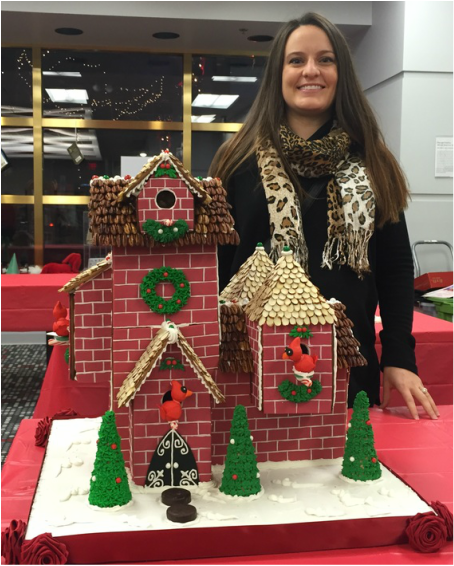
Not the best picture of me, but hey, I'm standing proud as my pregnant self. Hidden behind my gingerbread house, of course. This gives you a good idea of the size of the entry. And while I didn't manage to bring home the grand prize, I still placed a solid 2nd. Congratulations to the first place winner, Diane Beth, who managed to capture more of the North Carolina (and specifically Raleigh) theme. Her liberal use of candy was probably what got all the kids votes. I really should think about those kids votes more. They were all over that thing when I went to place my own vote.

Overall, despite the time commitment, I really enjoyed making this year's gingerbread house. All the entries were placed in a silent auction and the proceeds went to the Triangle Family Services. Gotta feel good about that.
I will probably stick with the gingerbread competitions for as long as I can. Once you reach a certain age, the opportunities for competitions start to dwindle. I'm certainly not running any marathons anytime soon. Edible creations it is! Gotta feed my competitive spirit until my child is old enough for me to live vicariously through.
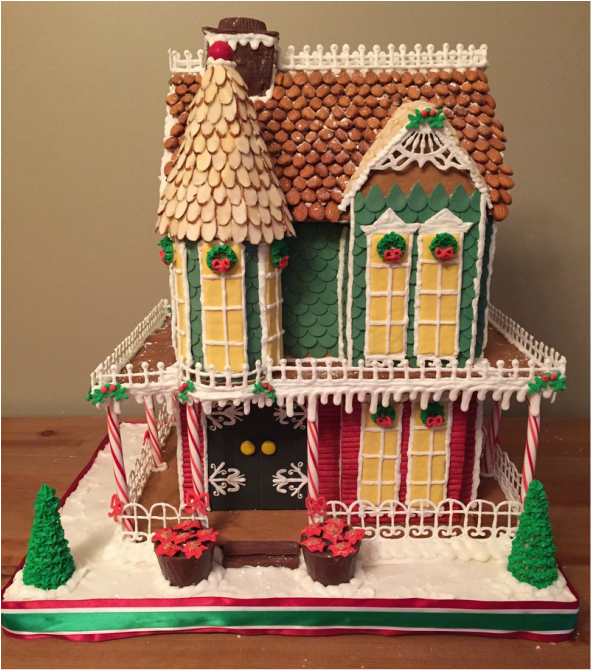
With that, I will provide you with a picture of last year's winning entry. I'd originally planned to do a separate blog post for this one, but I don't think I have enough pictures. Maybe one day. Until then... cheers!
I will probably stick with the gingerbread competitions for as long as I can. Once you reach a certain age, the opportunities for competitions start to dwindle. I'm certainly not running any marathons anytime soon. Edible creations it is! Gotta feed my competitive spirit until my child is old enough for me to live vicariously through.
With that, I will provide you with a picture of last year's winning entry. I'd originally planned to do a separate blog post for this one, but I don't think I have enough pictures. Maybe one day. Until then... cheers!
A Victorian Christmas


 RSS Feed
